THE PRESET SHAPES TOOL
You use the Preset Shapes tool to draw rectangles, squares, ellipses, circles, triangles, pentagons, hexagons, octagons, stars, and arrows. There are several tool options you can set when working with a preset shape.
| Preset Shape Tool Options | |
| Line Width | Determines the width of the line that outlines a preset shape. |
| Antialias | Smoothes the edges of the preset shape. |
| Create As Vector | Enables you to create the preset shape as a vector object (refer to the layers section for more information on vector objects). If you select the Create As Vector option and your active layer is not a vector layer, Paint Shop Pro automatically creates a new vector layer. |
| Join | Determines the shape of the object's corners. A miter join produces pointed corners, a round join produces round corners, and a bevel join produces flat corners. |
| Stroked Style | If you left-click as you drag to draw the object, the Stroked style creates an outline of the shape in the foreground color. If you right-click as you drag to draw the object, the Stroked style creates an outline of the shape in the background color |
| Filled Style | Draws the preset shape with no outline and filled with the foreground color if you left-click as you drag to draw the object. Draws the preset shape with no outline and filled with the background color if you right-click as you drag to draw the object. |
| Stroked and Filled Style | Outlines the preset shape and fills the shape with color. If you left-click as you draw, you will outline the preset shape with the foreground color and fill the preset shape with the background color. If you right-click as you draw, you will outline the preset shape with the background color and fill the preset shape with the foreground color. |
Exercises
Stroked � Raster
With the Stroked style, if you left-click as you drag to draw the object, the Stroked style creates an outline of the shape in the foreground color. If you right-click as you drag to draw the object, the Stroked style creates an outline of the shape in the background color. Objects on raster layers, are not independent of one another and cannot be moved without affecting the rest of the objects on the layer.
- Open a new file.
File > New
Settings:
Width: 100 Pixels
Height: 100 Pixels
Resolution: 72 Pixels/inch
Background Color: White
Image Type: 16.7 Million Colors
- Set your foreground color to green.
Settings:
Red: 0
Green: 128
Blue: 0
- Select the Preset Shapes tool
 .
Set the tool options.
Preset Shapes Tab Settings:
Shape Type: Ellipse
Style: Stroked
Line Width: 5
Antialias: Yes
Create As Vector: No
- Move to the center of the canvas, left-click, and drag outward to create an ellipse.
- Your image should look like the one shown here.

- Close the file. Save the file if you like.
File > Close
Filled � Vector
The Filled style draws the preset shape with no outline and filled with the foreground color if you left-click as you drag to draw the object. The Filled style draws the preset shape with no outline and filled with the background color if you right-click as you drag to draw the object. Vector objects are independent of each other and can be moved without affecting other objects on the layer.
- Open a new file.
File > New
Settings:
Width: 100 Pixels
Height: 100 Pixels
Resolution: 72 Pixels/inch
Background Color: White
Image Type: 16.7 Million Colors
- Set your foreground color to green.
Settings:
Red: 0
Green: 128
Blue: 0
- Set your background color to brown.
Settings:
Red: 128
Green: 0
Blue: 0
- Select the Preset Shapes tool. Set the tool options.
Preset Shapes Settings:
Shape Type: Triangle
Style: Filled
Line Width: 5
Antialias: Yes
Create As Vector: Yes
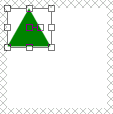
- Move the pointer to the upper left corner of the canvas and drag downward diagonally to create a triangle. Your image should look like the one shown here.
- Deselect the triangle.
Selections > Select None
- Select the Preset Shapes tool.
Preset Shapes Tab Settings:
Shape Type: Octagon
Style: Filled
Line Width: 5
Antialias: Yes
Create As Vector: Yes
- Move the pointer to the center of the canvas, right-click, and drag downward diagonally to create an octagon. Your image should look like the one shown here.
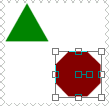
- Left-click the center handle and drag the octagon upward. Notice that the octagon moves independent of the triangle.

- Close the file. Save the file if you like.
File > Close
Stroked and Filled Vector
The stroked and filled style outlines the preset shape and fills the shape with color. If you left-click as you draw, you will outline the preset shape with the foreground color and fill the preset shape with the background color. If you right-click as you draw, you will outline the preset shape with the background color and fill the preset shape with the foreground color.
- Open a new file.
File > New
Settings:
Width: 100 Pixels
Height: 100 Pixels
Resolution: 72 Pixels/inch
Background Color: White
Image Type: 16.7 Million Colors
- Set your foreground color to green.
Settings:
Red: 0
Green: 128
Blue: 0
- Set your background color to yellow.
Settings:
Red: 255
Green: 255
Blue: 0
- Select the Preset Shapes tool. Set the tool options.
Preset Shapes Tab Settings:
Shape Type: Arrow 1
Style: Stroked & Filled
Line Width: 5
Antialias: Yes
Create As Vector: Yes
- Move the pointer to the left center of the canvas and drag the pointer towards the right side of the canvas to create an arrow.
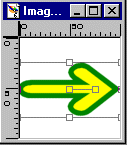
- Make any necessary adjustments to the size and placement of the arrow. Your image should look like the one shown here.
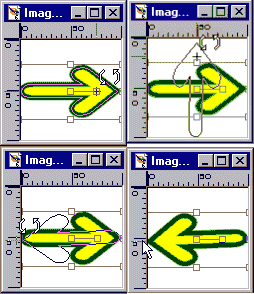
- Change the direction of the arrow by dragging the rotation handle, as shown here.
- Close the file. Save the file if you like.
File > Close
| Table of Contents |

