
LAYERS -- CONTINUED
Exercises:
Background Layer -- Colored Background
This exercise illustrates how using a colored background creates a "Background" layer.
- Open a new file.
File > New
Settings:
Width: 100 Pixels
Height: 100 Pixels
Resolution: 72 pixels/inch
Background Color: White
Image Type: 16.7 Million Colors
- Select Layers from the menu bar.
- Look at the bottom of the Layers menu. Note that there is a "Background" layer.
- Close the image. Save your image if you like.
File> Close
Transparent Background
This exercise illustrates the effect of using a transparent background. When you use a transparent background, Paint Shop Pro does not create a "Background" layer.
- Open a new file.
File > New
Settings:
Width: 100 Pixels
Height: 100 Pixels
Resolution: 72 pixels/inch
Background Color: Transparent
Image Type: 16.7 Million Colors
- Select Layers from the menu bar.
- Look at the bottom of the Layers menu. Note that there is no "Background" layer. The checkerboard background displaying on the canvas indicates the image is transparent.
- Close the image.
File> Close
Save your image if you like.
Working with Layers
This exercise illustrates the effect of placing objects on three separate layers.
- Open a new file.
File > New
Settings:
Width: 100 Pixels
Height: 100 Pixels
Resolution: 72 pixels/inch
Background Color: White
Image Type: 16.7 Million Colors
- Set your Grid Preferences.
File > Preferences > General Program Preferences > Rulers and Units
Units: Pixels
Horizontal Spacing: 20
Vertical Spacing: 20
- Turn on the Grid, if it is not already on.
View > Grid
- Set your foreground color to red:
Settings:
Red: 255
Green: 0
Blue: 0
- Set your background color to blue.
Settings:
Red: 0
Green: 0
Blue: 255
- Create three new raster layers.
Layers > New Raster Layer
Name: Bottom
Blend Mode: Normal
Opacity: 100
Group: 0
Layer is Visible: Yes
Lock Transparency: No
Mask is Enabled for the Layer: Yes
Mask is Locked with Layer: Yes
Auto Proof: Yes
Layers > New Raster Layer
Name: Middle
Blend Mode: Normal
Opacity: 100
Group: 0
Layer is Visible: Yes
Lock Transparency: No
Mask is Enabled for the Layer: Yes
Mask is Locked with Layer: Yes
Auto Proof: Yes
Layers > New Raster Layer
Name: Top
Blend Mode: Normal
Opacity: 100
Group: 0
Layer is Visible: Yes
Lock Transparency: No
Mask is Enabled for the Layer: Yes
Mask is Locked with Layer: Yes
Auto Proof: Yes
- Move to the Middle layer.
Layers > Middle
- Select the Paint Brush tool.
Shape: Square
Size: 20
Hardness: 100
Opacity: 100
Step: 25
Density: 100
Paint Brush Options
Paper Texture: None
Built Up Brush: Yes
- Draw a red line across the center of the image by using the Paint Brush tool and the foreground color (left-click to draw).

- Move to the Bottom layer.
Layers > Bottom
- Draw a blue line down the second column of the image by using the Paint Brush tool and the background color (right-click to draw).

Note how the blue line appears behind the red line.
- Move to the Top layer.
Layers > Top
- Draw a blue line down the fourth column of the image by using the Paint Brush tool and the background color (right-click to draw).
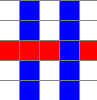
Note how the blue line appears in front of the red line.
- To see the contents of each layer, open the Layers palette (press the letter "l" on your keyboard) and place the pointer on the layer names one at a time.
- Move to the Bottom layer.
Layers > Bottom
- Move the Bottom layer to the top.
Layers > Arrange > Bring to Top
- Close the image. Save your image if you like.
File> Close
Moving a Layer
This exercise illustrates moving a layer.
- Open a new file.
File > New
Settings:
Width: 200 Pixels
Height: 200 Pixels
Resolution: 72 Pixels/inch
Background Color: White
Image Type: 16.7 Million Colors
- Create two new raster layers.
Layers > New Raster Layer
Name: Green
Blend Mode: Normal
Opacity: 100
Group: 0
Layer is Visible: Yes
Lock Transparency: No
Mask is Enabled for the Layer: Yes
Mask is Locked with Layer: Yes
Auto Proof: Yes
Layers > New Raster Layer
Name: Orange
Blend Mode: Normal
Opacity: 100
Group: 0
Layer is Visible: Yes
Lock Transparency: No
Mask is Enabled for the Layer: Yes
Mask is Locked with Layer: Yes
Auto Proof: Yes
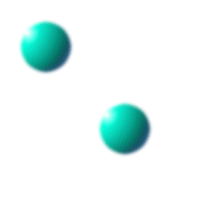
- Move to the Green layer.
Layers > Green
- Select the Picture Tube tool.
Settings:
Tube: 3D Green
Scale: 100
Placement Mode: Random
Selection Mode: Random
Step: 1
- Click twice on the image to create two spheres. Your image should look like the one shown here.
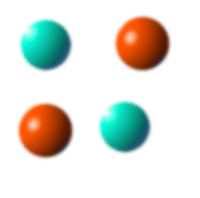
- Move to the Orange layer.
Layers > Orange
- Select the Picture Tube tool.
Settings:
Tube: 3D Orange
Scale: 100
Placement Mode: Random
Selection Mode: Random
Step: 1
- Click twice on the image to create two spheres. Your image should look like the one shown here.
- Select the Mover tool
 .
. - Click on a green sphere and drag to move the green layer.
- Click on an orange sphere and drag to move the orange layer.
- Hold down the Shift key as you place the pointer on the image to move to the active layer.
- Close the image. Save your image if you like.
File> Close
Layer: Blend Modes
Blend Modes are particularly useful when you want to change the color but maintain the gradations of color on the existing image. The exercise that follows illustrates using a Blend Mode with a layer.
- Open Smearing Gold.pat.
File > Browse
In the Browse window, open the Patterns folder under the Paint Shop Pro 6 folder. Double-click on Smearing Gold.pat.
- Close the Browse window.
- Make a copy of the image.
Edit > Copy
- Create a new image so you can work with the new image instead of the original.
Edit > Paste > As New Image
- Set your foreground color to green.
Settings:
Red: 0
Green: 128
Blue: 0
- Create a new raster layer.
Layers > New Raster Layer
Name: Color
Blend Mode: Normal
Opacity: 100
Group: 0
Layer is Visible: Yes
Lock Transparency: No
Mask is Enabled for the Layer: Yes
Mask is Locked with Layer: Yes
Auto Proof: Yes
- Flood-fill the image with the foreground color.
Flood Fill Tab Settings:
Fill Style: Solid Color
Blend Mode: None
Paper Texture: None
Match Mode: None
Opacity: 100
Sample Merged: Yes
- Open the Layer Property dialog box (press the letter "l" on your keyboard). Cycle through the Blend Mode options. Note the effect on your image.
Layers > Properties

- Close the files. Do not save Smearing Gold.pat. Save the new image, if you like.
File > Close
| Table of Contents |