LAYERS
Think of a layer as a transparent sheet on which you paint. Paint Shop Pro allows up to 100 layers. You can see through each layer to the layers under it until you add color. You can add layers, delete layers, and change the position of layers. Each layer is independent of all other layers until layers are merged. The layer you are currently working on is called the active layer. There are three types of Paint Shop Pro layers: raster, vector, and adjustment.
Raster layers store information by using pixels. If you zoom in on an image, you can see small squares. Each of these squares is a pixel. On a raster layer a single object cannot be moved without affecting the entire layer.
Vector layers do not use pixels to store information. Instead, vector layers store the instructions on how to draw the image. On a vector layer, each object is independent and can be moved without affecting the rest of the layer.
Vector objects cannot be placed on raster layers, and raster objects cannot be placed on vector layers. You can, however, merge a vector layer with a raster layer�the result is a raster layer. Vector layers can be used with images of any color depth. Raster layers can be used only with 24-bit and grayscale images.
Adjustment layers are used to make color corrections to multi-layer images. Corrections are made to the layers below the active layer. Adjustment layers are not covered in this lesson.
The "Background" layer is a special type of layer. When you create a new image and select any "colored" Background type, Paint Shop Pro displays the selected color as a background on a layer Paint Shop Pro creates called the "Background" layer. When you select transparent as the background color, Paint Shop Pro creates a layer called Layer 1, displays the background as checkerboard, and does not create a "Background" layer.
The checkerboard background created when you select Transparent as the background color cannot be moved. The "Background" layer displays the background and likewise cannot be moved up the stack of layers. The contents of the "Background" layer can, however, be promoted to a layer.
You use the Mover tool to move layers. The Mover tool finds the first
nontransparent area beneath where you place the pointer and moves that
layer. This might not be the current active layer. To move the active
layer, hold down the Shift key as you place your pointer on the image.
| Layer Options | |
| Layer Group | Assigns a group number. All layers assigned the same number are members of the same group. If you move a layer that is a member of a group, all the layers in that group move with it. |
| Opacity | Determines the transparency of a layer. A setting of 1 makes the paint almost completely transparent. A setting of 100 makes the paint opaque. |
| Layer Visible | Select to view a layer. Deselect to makes the layer invisible. |
| Lock Transparency | Restricts the any effects applied to nontransparent areas of the image. If this option is selected, you cannot paint or paste to any transparent area. This option is not available for vector and adjustment layers. |
| Mask Enabled for This Layer | Select to view the layer with the effect of any mask that has been applied to the layer. Deselect to view the layer without the effect of any mask that has been applied to the layer. |
| Mask Locked with Layer | Select to flip, rotate, and mirror the mask and the image together. If not selected, these options are applied to the mask and the layer independent of one another. |
The Layer Palette
The Layer palette is a useful tool when you're working with images that contain more than one layer. It provides several icons that enable you to easily adjust your layer options. You open the Layer palette by clicking on the Toggle Layer Palette icon on the toolbar or by pressing "L" on the keyboard.
![]()
Toggle Layer Palette Icon
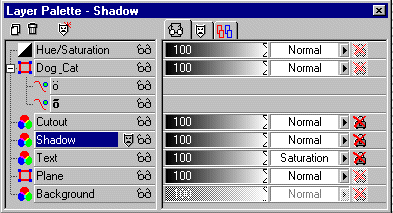
Layer Palette Options
| Layer Palette Options | |
| Creates a new layer. | |
| Deletes the selected layer. | |
| Creates a mask. | |
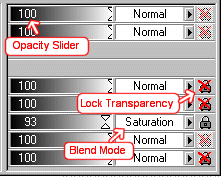
| Displays the Layer Opacity slider, Blend
Mode icon, and Lock Transparency icon.
Opacity slider: Adjusts the layer's opacity. Layer Blend Mode icon: Selects a Blend Mode. Lock Transparency icon: Toggles the Lock Transparency option on and off. |
|
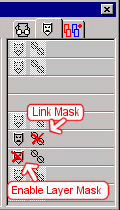
| Displays the Enable Layer Mask Toggle
and the Link Mask Toggle.
Enable Layer Mask: Toggle on to view the layer with the effect of any mask that has been applied to the layer. Toggle off to view the layer without the effect of any mask that has been applied to the layer. Link Mask: Toggle on to flip, rotate, and mirror the mask and image together. Toggle off to apply these options to the mask and the layer independent of one another. |
|
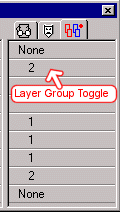
| Displays the Layer Group Toggle.
Clicking in the Layer Group Toggle toggles through layer numbers. All layers with the same number are members of the same group. None means the layer is not assigned to a group. |
|
| Identifies raster layers. | |
| Identifies vector layers. | |
| Identifies adjustment layers. | |
| Placing the pointer on a layer name and pausing for a second causes the contents of the layer to display. | |
| Placing the pointer on a mask and pausing for a second causes the mask to display. | |
| Toggles the layer visibility on and off. If the visibility is on, you can see the layer/object. If the visibility is off, you cannot see the layer/object. | |
| Table of Contents |
