TEXT TOOL
You use the Text tool to add text to your image. You click on the tool, and then you click on the image to open the Text Entry dialog box. In the Text Entry dialog box, you can select the font, font size, and script (generally you will use Western script). A sample of your selection appears in the sample box. Your font size is not limited to the numbers that display on the drop-down menu. You can make your font size greater than 72, and you can enter numbers between the numbers displayed on the drop-down menu. For example, the drop-down menu displays 48, followed by 72, but you can enter 65 in the Font Size box if you wish.
You determine how you want your text created by selecting from Vector, Selection, or Floating in the Create As frame. Selecting Vector creates your text as a vector object on a vector layer. If your active layer is not a vector layer, Paint Shop Pro automatically creates a new vector layer. Vector text, like other vector objects, can be deformed, moved independently, and edited. Vector text can be displayed horizontally or placed on a path. Text placed on a path follows the path, enabling you, for example, to put text in a circle or have text follow any other type of design.
If you choose Selection, the text is created as a transparent selection on the active layer. You can work with the text as you would any other selection. Any of the painting tools can be applied to the text and you can promote the text to a layer if you wish. Text created as a selection cannot be placed on a vector layer; however, it can be placed on a path.
If you select Floating, the text is created as a floating selection above the active layer. You can work with the text just as you would any other floating selection and any of the paint tools can be applied to the text. Although floating text cannot be put on a vector layer, it can be put on a path.
Choosing Antialias in the Create As frame smoothes the edges of your font. You will almost always want to select Antialias.
In the Text Settings frame, you select from Kerning, Leading, and Auto Kern. Kerning adjusts the space between characters without changing the width of individual characters. You can move character closer together by reducing the kerning value. You can increase the space between characters by increasing the kerning value. Select Auto Kern to let Paint Shop Pro set the kerning value.
The Leading value adjusts the distance between lines of text. Increase the leading value to increase the distance between lines of text, and decrease the leading value to decrease the distance between lines of text.
In the Text Effects frame, you select the color of your text. The active colors display in the Text Effects frame. You can select one of the active colors by clicking on the color. The color will then display in the color box. If you want to choose an alternate color, click on the color box and choose a color from the palette. Your text can be multiple colors if you highlight the letters individually and apply color.
You can bold, underline, italicize, or apply a strike-through effect to text by clicking on the appropriate icon. The left-align, right-align, and center options control how multiple lines of text are displayed in relationship to one another.
You enter your text in the Enter Text Here box.
Exercises:
Kerning
This exercise illustrates kerning (adjusting the space between characters).
- Open a new file.
File > New
Settings:
Width: 5 Inches
Height: 1.5 Inches
Resolution: 72 pixels/inch
Background Color: White
Image Type: 16.7 Million Colors
- Set your foreground color to black.
Settings:
Red: 0
Green: 0
Blue: 0
- Select the Text tool. Click on the image to add text. Set the tool options.
Settings:
Name: Arial
Size: 10
Script: Western
Create As: Vector
Antialias: Yes
Kerning: 0
Leading: 0
Auto Kern: Yes
Center (select the Center icon)
Set the Text to the foreground color (click on the foreground color).
Enter Text Here: This is an example of kerning.
- Position the text in the upper center of the canvas.
- Deselect the text.
Selections > Select None
- Select the Text tool and then click on the image to add text.
Settings:
Name: Arial
Size: 10
Script: Western
Create As: Vector
Antialias: Yes
Kerning: 290
Leading: 0
Auto Kern: No
Center (select the Center icon)
Set the Text to the foreground color. Enter Text Here: This is an example of kerning.
- Position the text in the lower center of the canvas.
- Deselect the text.
Selections > Select None
- Your text should look like the text shown here.

- Close the image. Save your image if you like.
File> Close
Leading
This exercise illustrates leading (adjusting the distance between lines of text).
- Open a new file.
File > New
Settings:
Width: 5 Inches
Height: 1.5 Inches
Resolution: 72 pixels/inch
Background Color: White
Image Type: 16.7 Million Colors
- Set your foreground color to black.
Settings:
Red: 0
Green: 0
Blue: 0
- Select the Text tool. Click on the image to add text. Set the tool options.
Settings:
Name: Arial
Size: 10
Script: Western
Create As: Vector
Antialias: Yes
Kerning: 0
Leading: 0
Auto Kern: Yes
Center (select the Center icon)
Set the Text to the foreground color.
Enter Text Here:
This is an example of leading.
Leading sets the space between lines.
- Position the text in the upper center of the canvas.
- Deselect the text.
Selections > Select None
- Select the Text tool. Click on the image to add text. Set the tool options.
Settings:
Name: Arial
Size: 10
Script: Western
Create As: Vector
Antialias: Yes
Kerning: 0
Leading: 10
Auto Kern: No
Center (select the Center icon)
Set the Text to the foreground color.
Enter Text Here:
This is an example of leading.
Leading sets the space between lines.
- Position the text in the lower center of the canvas.
- Deselect the text.
Selections > Select None
- Your image should look similar to the one shown here.

- Close the image. Save your image if you like.
File> Close
Selection
- Open a new file.
File > New
Settings:
Width: 5 Inches
Height: 1.5 Inches
Resolution: 72 pixels/inch
Background Color: White
Image Type: 16.7 Million Colors
- Select the Text tool. Click on the image to add text. Set the tool options.
Settings:
Name: Rockwell Extra Bold (If you do not have Rockwell Extra Bold, use any wide font.)
Size: 36
Script: Western
Create As: Selection
Antialias: Yes
Kerning: 0
Leading: 0
Auto Kern: Yes
Center (select the Center icon)
Enter Text Here: Selection
- Float the selection
Selections > Float
- Position the text in the center of the canvas.
- Select the Flood Fill tool. Set the tool options.
Flood Fill Tab Settings:
Fill Style: Linear Gradient
Blend Mode: Normal
Paper Texture: None
Match Mode: None
Opacity: 100
Sample Merged: Yes
Flood Fill Options
Gradient: Purple-Blue-Orange
Angle: 0
Repeats: 0
- Flood-fill the selection. Click anywhere in the selected area.
- Deselect the text.
Selections > Select None
- Your text should look like the text shown here.

- Close the image.
File> Close
Save your image if you like.
Floating Text
- Open a new file.
File > New
Settings:
Width: 5 Inches
Height: 1.5 Inches
Resolution: 72 pixels/inch
Background Color: White
Image Type: 16.7 Million Colors
- Set your foreground color to red.
Settings:
Red: 254
Green: 65
Blue: 40
- Select the Flood Fill tool.
Settings:
Flood Fill tab
Fill Style: Solid Color
Blend Mode: Normal
Paper Texture: Mist
Match Mode: None
Opacity: 100
Sample Merged: Yes
- Flood-fill the entire image.
- Select the Text tool. Click on the image to add text. Set the tool options.
Settings:
Name: Gigi (If you do not have Gigi, use any font you like.)
Size: 48
Script: Western
Create As: Floating
Antialias: Yes
Kerning: 0
Leading: 0
Auto Kern: Yes
Set the text to the foreground color (click on the foreground color).
Center (select the Center icon)
Enter Text Here: Floating
- Make sure the text is in the center of the image.
- Deselect the text.
Selections > Select None
- Your image should look similar to the image shown here.

- Close the image. Save your image if you like.
File> Close
Floating Text on a Path
- Open a new file.
File > New
Settings:
Width: 400 Pixels
Height: 200 Pixels
Resolution: 72 pixels/inch
Background Color: White
Image Type: 16.7 Million Colors
- Set your foreground color to purple.
Settings:
Red: 128
Green: 0
Blue: 128
- Select the Preset Shapes tool.
- Set the tool options.
Settings:
Shape Type: Ellipse
Style: Stroked
Line Width: 1
Antialias: Yes
Create As Vector: Yes
- Draw an ellipse in the center of the canvas.
- Move the ellipse down to make room for the text.
- Select the Text tool.
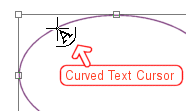
- Place the pointer on the vector object. The Curved Text cursor will appear.

- Select the Text tool. Click on the image to add text. Set the tool options.
Name: Arial
Size: 18
Script: Western
Create As: Floating
Antialias: Yes
Kerning: 0
Leading: 0
Auto Kern: Yes
Set the Text to the foreground color (click on the foreground color).
Center (select the Center icon)
Enter Text Here: floating on a path
- Deselect the text.
Selections > Select None
You will be prompted: "The current floating selection will be defloated down to the nearest raster layer. Do you want to continue?" Click "Yes."
- Press the Delete key to delete the vector object. Your image should look like the one shown here.

- Close the image. Save your image if you like.
File> Close
Note: Right-aligning the text places the text on the right side of the image. Left-aligning the text places the text on the left side of the image.
Left-aligned
Right-aligned
Vector Text on a Path
- Open a new file.
File > New
Settings:
Width: 400 Pixels
Height: 200 Pixels
Resolution: 72 pixels/inch
Background Color: White
Image Type: 16.7 Million Colors
- Set your foreground color to brown.
Settings:
Red: 128
Green: 0
Blue: 0
- Set your background color to black.
Settings:
Red: 0
Green: 0
Blue: 0
- Select the Draw tool.
Draw Tab Settings:
Type: Freehand Line
Style: Stroked
Width: 1
Antialias: Yes
Create as Vector: Yes
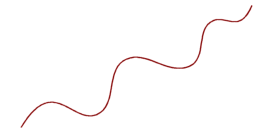
- Left�click and draw a line like the one shown here.

- Select the Text tool.
- Click on the vector line.
- Set the Text tool options.
Settings:
Name: Arial
Size: 18
Script: Western
Create As: Vector
Antialias: Yes
Kerning: 125
Leading: 0
Auto Kern: No
Set the Text to the background color (click on the background icon).
Center (select the Center icon)
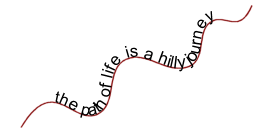
Enter Text Here: The path of life is a hilly journey.
- Deselect the vector object.
Selections > Select None

- Close the image. Save your image if you like.
File > Close
Table of Contents


