SELECTING
A selection is a specific area of the image that can be edited or to which an effect can be applied. A selection can be the whole image or part of an image.
| Definitions: | |
| Marquee | Rotating dotted lines that outline the selected area. |
| Feathering | Softens the edges of a selected area and causes the image to fade into the background. |
| Floating Selection | A selection that resides just above the image. Floating a selection enables you to select without affecting the original image. The Layers palette indicates a floating selection with the label "Floating Selection." |
| Standard Selection | A selection of part of the image. Moving or modifying a standard selection modifies the image. Paint Shop Pro provides options that enable you to float and defloat a selection. |
| Antialias | Selected edges can appear jagged. Antialiasing smoothes the edges. |
| Matting | When you move a selection, some of the pixels around the edges are also moved. Matting removes these pixels. |
| Defringe | Causes nonfeathered pixels to bleed outward, creating a smooth transition from the selected area to the surrounding area. |
| Alpha Channel | Used to save selections with the image. Selections can also be saved to disk. |
| Sample Merged | When Sample Merged is selected, the Selection tool selects from all layers of the image. When Sample Merged is not selected, only the active layer is affected. |
| Match Mode | Method used to select an area by using the Magic Wand. The choices are RGB value, Hue, Brightness, or Pixels. |
| Tolerance | Specifies how close a match must be (the type of match is specified in the Match Mode field). A tolerance of zero requires an exact match. A tolerance of 200 provides the maximum amount of leeway in determining whether there is a match. |
| Brightness | The amount of white contained in a pixel. |
Paint Shop Pro provides three tools for making a selection: the Selection tool, the Freehand tool, and the Magic Wand.
Things You Need to Know
- To add to a selection, hold down the Shift key while selecting the additional area.
- To remove an area from the current selection, hold down the Ctrl key while selecting the area to be removed.
- To move a selection, select the mover tool and right-click on the selection while you drag the pointer.
The Tool Options Dialog Box
You use the Tool Options dialog box to set the tool settings. To open the Tool Options dialog box:
- Select your tool by clicking on its icon.
- Click on the Toggle Tool Options Window icon on the toolbar. The Tool Options dialog box will appear.
The Toggle Tool Options Window Icon
Exercises:
The Selection Tool
Using the Selection tool, you can select the whole image or part of the image. Your selection can be in the shape of a rectangle, a square, an ellipse, or a circle.
Using the Selection tool, select the little boy's head.
- If you have not already done so, click here to download the files you will use to complete the exercises.
- Open boy.jpg in Paint Shop Pro.
File > Open
Look in: Enter the directory in which you stored your files.
File: boy.jpg
Files of Type: JPEG-JFIF Compliant (*.jpg, *.jif, *.jpeg) - Click on the Selection tool
 .
. - Click on the Toggle Tool Options Window icon
 .
The Tool Options dialog box will appear.
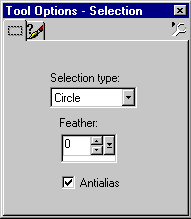
Tool Settings:
Selection Type: Circle
Feather: 0
Antialias: Yes
- Select the boy�s head. Place the pointer in the center of the boy�s head and drag outward.
- Float the selection.
Selections > Float
- Move the selection around and note that the selection moves without affecting the original image.
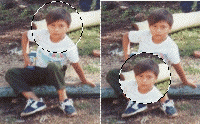
- Defloat the selection. Move the selection. Note that as you move the selection, the background color shows through.
Selection > Defloat
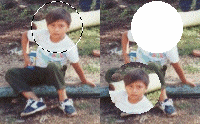
- Close the image. Do not save your changes.
File > Close
The Freehand Tool
The Freehand tool provides three selection methods: the freehand method, the point-to-point method, and the Smart Edge method. With the freehand method, you use the pointer to draw the area you want to select. With the point-to-point method, you create a selected area consisting of straight lines. The Smart Edge method is used to create a selection along a border of contrasting color or light.
Freehand Method
Using the Freehand tool and the freehand method, select the triangle.
- Open triangle.gif in Paint Shop Pro. Triangle.gif is included in the file you downloaded.
File > Open
Look in: Enter the directory in which you stored your files.
File: triangle.gif
Files of Type: CompuServe Graphics Interchange(*.gif)
- Click on the Freehand tool
 .
. - Make sure the Toggle Tool Options Windows icon
 is
selected. The Tool Options dialog box should be open.
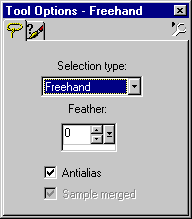
Tool Settings:
Selection Type: Freehand
Feather: 0
Antialias: Yes
Sample Merged: Yes
- Select the triangle by drawing around it.

- Deselect the selected area.
Selections > Select None
The Point-to-Point Method
To create a point-to-point selection:
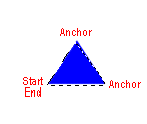
- Left-click to start the selection.
- Drag the pointer to form a straight line.
- Left-click again where you want to anchor the line.
- Continue selecting until you have selected the area you want.
- Double-click or right-click to end your selection.
- Make sure the Freehand tool is selected.
- Make sure the Toggle Tool Options Window icon is selected. The Tool Options dialog box should be open.
Tool Settings:
Selection Type: Point-to-Point
Feather: 0
Antialias: Yes
Sample Merged: Yes
- Select the triangle using the freehand method.

- Deselect the selected area.
Selections > Select None
The Smart Edge Method
To create a Smart Edge selection:
- Left-click to start the selection.
- Drag the pointer over the area. Your edge should be inside the box.
- Left-click again where you want to anchor the box.
- Continue left-clicking until you have selected the area you want.
- Double-click or right-click to end your selection.
- Make sure the Freehand tool is selected.
- Make sure the Toggle Tool Options Window icon is selected. The Tool options dialog box should be open.
Tool Settings:
Selection Type: Smart Edge
Feather: 0
Antialias: Yes
Sample Merged: Yes
- Select the triangle using the smart edge method.
- Deselect the selected area.
Selections > Select None
The Magic Wand
You use the Magic Wand to select areas based on RGB value, Hue, Brightness, or Pixels. When RGB is selected in the Match Mode field, Paint Shop Pro selects areas based on the RGB value of the pixel. When Hue is selected, areas are selected based on the hue (color) of the pixel. Selecting Brightness causes areas to be selected based on brightness. The Tolerance field is used to determine how close the match must be. When Pixel is selected in the Mode field, all areas with pixels are selected; areas that are transparent are not selected.
Make a selection using the Magic Wand.
- Select the Magic wand.
- Make sure the Toggle Tool Options Window icon is selected. The Tool Options dialog box should be open.
Tool Settings:
Match Mode: Hue
Tolerance: 30
Feather: 0
Sample Merged: Yes
- Click on the blue triangle to select by hue.

- Deselect the selected area.
Selections > Select None
- Close the image.
Feathering
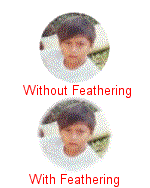
Feathering softens the edges of a selected area and causes the image to fade into the background. This exercise illustrates the feathering effect.
- Open boy.jpg in Paint Shop Pro.
File > Open
Look In: Enter the directory in which you stored your files.
File: boy.jpg
Files of Type: JPEG-JFIF Compliant (*.jpg, *.jif, *.jpeg)
- Open a new file but do not close boy.jpg. Make a note of the name of your new file. The name displays on the title bar.
File > New
Settings:
Width: 200 Pixels
Height: 250 Pixels
Resolution: 72 Pixels/inch
Background Color: White
Image Type: 16.7 Million Colors
- Move back to the boy.jpg window.
Window > boy.jpg
- Select the Selection tool.
Tool Settings:
Selection Type: Circle
Feather: 0
Antialias: Yes
- Select a circle around the little boy's head.
- Copy the selection.
Edit > Copy
- Move to the new image.
Window > Image1 (Your filename might be different.)
- Paste the selection.
Edit > Paste > As New Selection
- Deselect.
Selections > Select None
- Move back to boy.jpg.
Window > boy.jpg
- Feather the selection.
Selections > Modify > Feather
Number of Pixels: 5
- Copy the selection.
Edit > Copy
- Move to the new image.
Window > Image1
- Paste the selection.
Edit > Paste > As New Selection
- Deselect.
Selections > Select None
- Your image should look similar to the one shown here.
- Close the image. Do not save boy.jpg. You will use it in future exercises.
| Table of Contents |

