COLOR
This lecture is on color: how color is determined and how to select foreground and background colors.
| Definitions: | |
| Hue | A color or shade of color. Paint Show Pro's hue settings are used to determine color. |
| Lightness | Amount or intensity of light found in a color. A setting of zero is equal to black. A setting of 255 is equal to white. |
| Saturation | The strength of hue or the amount of gray in a color. A color with a high degree of saturation has very little gray. |
| Active Colors | The colors available to you while you are working with Paint Shop Pro. Paint Shop Pro allows you two active colors, called the foreground and background colors. Press the left mouse button to apply the foreground color to the image; press the right mouse button to apply the background color to the image. |
Three methods are used to define and describe color. They are the RGB method, the HSL method, and the CMYK method.
Computer monitors use the RGB method. RGB stands for Red Green Blue. This method uses combinations of the three primary colors red, green, and blue to present all of the colors that display on the computer monitor. Each of these primary colors has a range of values from 0 to 255. Setting all of the values to 0 produces black. Setting all of the values to 255 produces white. By adjusting the Red, Green, and Blue values, you can produce the full spectrum of colors.
The HSL method uses hue, saturation, and lightness to define color. Each of these elements is assigned a value from 0 to 255. Hue is a color or shade of color. Lightness refers to the amount or intensity of light found in a color. A lightness setting of zero is equal to black, and a lightness setting of 255 is equal to white. Saturation refers to the amount of gray. A saturation value of 0 means there is a lot of gray, and a saturation value of 255 means there is no gray.
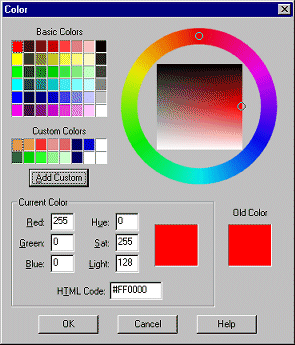
Paint Shop Pro arranges hues around a color wheel. You select the color you want by moving the pointer around the wheel. Saturation and lightness are represented by a square in the center of the color wheel. You increase lightness by moving from the top to the bottom of the square. You increase saturation by moving from left to right. Your selection displays in the Current Color frame.
The CMYK (Cyan/Magenta/Yellow/Black) method is most often used in printing. Cyan, magenta, and yellow are combined to produce the other colors, with the exception of black. Black is the fourth color.
The colors available to you while you are working with Paint Shop Pro are the "active colors." Paint Shop Pro allows you two active colors, the foreground and background colors. Press the left mouse button to apply the foreground color to the image, and press the right mouse button to apply the background color to the image.
Things You Need to Know:
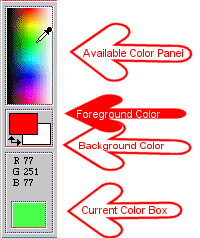
The Color Panel
To use the Color panel to select your active colors:
- Move the pointer to the Available Color panel. The pointer will change to a dropper. As you move the pointer around the Color panel, the current color displays in the Current Color box.

- Find the color you want. Left-click to select the color as the foreground color. Right-click to select the color as the background color.
The Color Dialog Box
The Color dialog box is the default dialog box and is available if you are working on a 24-bit image and your preference is not set to use the standard Windows Color Picker.

Basic Colors
To select a color by using the Color dialog box�s basic colors:
- Click once on the foreground or background color, depending on which one you wish to set. The Color dialog box will appear. Paint Shop Pro supplies 48 basic colors, located in the upper left corner of the dialog box.
- Click on a basic color and then click on OK to select the color.
The Color Wheel
You can also select colors by using the color wheel.
- Click on the color wheel and move your pointer to select the desired hue.
- Click on the saturation/lightness box to select the saturation and lightness. Move the pointer from left to right to increase saturation. Move the pointer from top to bottom to increase lightness.
- Click on OK to select the color.
RGB and HSL Values
If you know the color's RGB or HSL values, you can type the values in the appropriate boxes of the Current Color frame. HTML is the markup language used to create Web pages. Each color is assigned a code. If you know the color's HTML code, you can enter the value in the HTML Code field.
Custom Colors
The Color dialog box has sixteen boxes you can use to store custom colors (a custom color is any color you want to save in a custom color box). To move a color to one of the custom color boxes:
- Select the color.
- Right-click on the Add Custom button.
Selecting Color from an Image
- Click on the Dropper icon.
- Move the pointer to the area of the image where the color is located. The selected color displays in the Color box.
- Left-click to make the selected color the foreground color. Right-click to make the selected color the background color
The Color Palette
If you are working with an image that has 256 colors or less, you can click on the foreground or background color to display the Select Color From Palette dialog box. Select the color you want by clicking on it. You can sort the colors by palette order, luminance, or hue. The RGB value and HTML code appear at the bottom of the screen.
Recent Colors Dialog Box

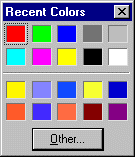
If you right-click on the foreground or background color, the Recent Colors dialog box will open. The colors shown in the top of the box are constant. The colors shown in the bottom of the box are the most recently used colors. If your image is less than 24-bit, some of the colors might not be available to you. Simply click on a color to select it.
Exercises:
The Color Panel
- Move your pointer to the Color panel. Your pointer will turn into a dropper.
- Place the pointer over the color green.
- Left-click to set the foreground color to green.
- Place the pointer over the color blue.
- Right-click to set the background color to blue.
Recent Colors Dialog Box
- Place your pointer on the foreground color.
- Right-click. The Recent Colors dialog box will open.
- Click on black to set the foreground color to black.
- Place your pointer on the background color.
- Right-click. The Recent Colors dialog box will open.
- Click on white to set the background color to white.
The Color Dialog Box
- Left-click on the foreground color to open the Color dialog box.
- In the Current Color frame enter the following values:
Red: 255
Green: 255
Blue: 192 - Click on OK to set the foreground color to yellow.
- Left-click on the background color.
- Click on the red box in the upper-right corner of the Basic Color panel.
- Click on OK to set the background color to red.
Selecting Color from an Image
- Open blue.psp. Click here to download the work
files if you have not already downloaded them.
File > Open
Look in: Enter the directory in which you stored your files.
File: blue.psp
Files of Type: All Files - Select the Dropper tool
 .
. - Left-click on the image to set the foreground color to blue.
| Table of Contents |

