
Lesson 1: The PowerPoint Window
PowerPoint is a presentation software package. With PowerPoint, you can easily create slide shows. Trainers and other presenters use slide shows to illustrate their presentations.
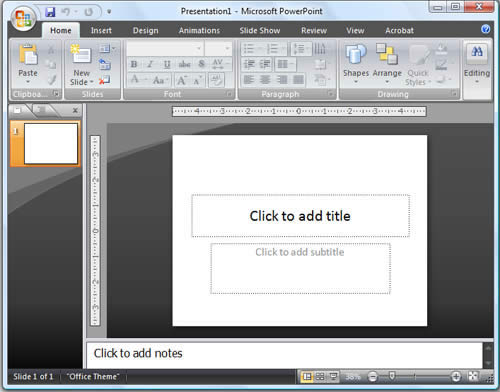
This lesson introduces you to the PowerPoint window. You use the window to interact with the software. To begin, open PowerPoint 2007. The window appears and your screen looks similar to the one shown.
Note: Your screen will probably not look exactly like the screen shown. In PowerPoint 2007, how a window displays depends on the size of the window, the size of your monitor, and the resolution to which your monitor is set. Resolution determines how much information your computer monitor can display. If you use a low resolution, less information fits on your screen, but the size of your text and images are larger. If you use a high resolution, more information fits on your screen, but the size of the text and images are smaller. Also, settings in PowerPoint 2007, Windows Vista, and Windows XP allow you to change the color and style of your windows.
![]()
In the upper-left corner is the Microsoft Office button. When you click the button, a menu appears. You can use the menu to create a new file, open an existing file, save a file, and perform many other tasks.
The Quick Access Toolbar

![]()
Next to the Microsoft Office button is the Quick Access toolbar. The Quick Access toolbar provides you with access to commands you frequently use. By default, Save, Undo, and Redo appear on the Quick Access toolbar. You use Save to save your file, Undo to rollback an action you have taken, and Redo to reapply an action you have rolled back.
The Title Bar
![]()
The Title bar is located at the top in the center of the PowerPoint window. The Title bar displays the name of the presentation on which you are currently working. By default, PowerPoint names presentations sequentially, starting with Presentation1. When you save your file, you can change the name of your presentation.

| 1 | Tabs |
| 2 | Command Group |
| 3 | Command Buttons |
| 4 | Launcher |
![]()
You use commands to tell PowerPoint what to do. In PowerPoint 2007, you use the Ribbon to issue commands. The Ribbon is located near the top of the PowerPoint window, below the Quick Access toolbar. At the top of the Ribbon are several tabs; clicking a tab displays several related command groups. Within each group are related command buttons. You click buttons to issue commands or to access menus and dialog boxes. You may also find a dialog box launcher in the bottom-right corner of a group. When you click the dialog box launcher, a dialog box makes additional commands available.
Rulers
![]()
![]()
Rulers are vertical and horizontal guides. You use them to determine where you want to place an object. If the rulers do not display in your PowerPoint window:
- Click the View tab.
- Click Ruler in the Show/Hide group. The rulers appear.
Slides, Placeholders, and Notes
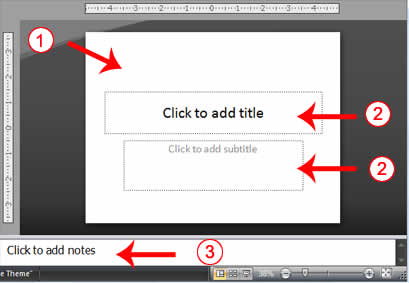
| 1 | Slide |
| 2 | Placeholders |
| 3 | Notes |
![]()
Slides appear in the center of the window. You create your presentation on slides.
Placeholders hold the objects in your slide. You can use placeholders to hold text, clip art, charts, and more.
You can use the notes area to creates notes to yourself. You can refer to these notes as you give your presentation.
Status Bar, Tabs, View Buttons, and More
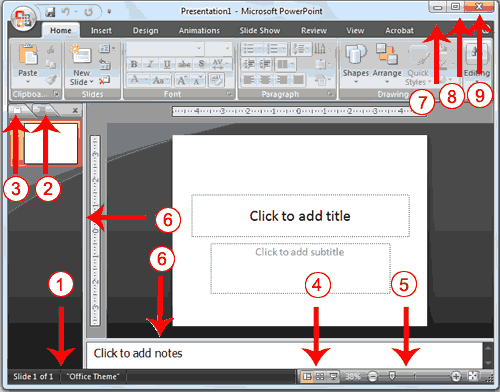
| 1 | Status Bar | 6 | Vertical & Horizontal Splitter Bars |
| 2 | Outline Tab | 7 | Minimize Button |
| 3 | Slides Tab | 8 | Maximize/Restore Button |
| 4 | View Buttons | 9 | Close Button |
| 5 | Zoom |
The Status bar generally appears at the bottom of the window. The Status bar displays the number of the slide that is currently displayed, the total number of slides, and the name of the design template in use or the name of the background.
The Outline tab displays the text contained in your presentation. The Slides tab displays a thumbnail of all your slides. You click the thumbnail to view the slide in the Slide pane.
The View buttons appear near the bottom of the screen. You use the View buttons to change between Normal view, Slider Sorter view, and the Slide Show view.
- Normal View

- Normal view splits your screen into three major sections: the Outline and Slides tabs, the Slide pane, and the Notes area. The Outline and Slides tabs are on the left side of your window. They enable you to shift between two different ways of viewing your slides. The Slides tab shows thumbnails of your slides. The Outline tab shows the text on your slides. The Slide pane is located in the center of your window. The Slide pane shows a large view of the slide on which you are currently working. The Notes area appears below the Slide pane. You can type notes to yourself on the Notes area.
- Slide Sorter View

- Slide Sorter view shows thumbnails of all your slides. In Slide Sorter view, you can easily add, delete, or change their order of your slides.
- Slide Show

- Use the Slide Show view when you want to view your slides, as they will look in your final presentation. When in Slide Show view:
| Esc | Returns you to the view you were using previously. |
| Left-clicking | Moves you to the next slide or animation effect. When you reach
the last slide, you automatically return to your previous view. |
| Right-clicking | Opens a pop-up menu. You can use this menu to navigate the slides, add speaker notes, select a pointer, and mark your presentation. |
Zoom ![]() allows you to zoom in and zoom out on the window. Zooming in makes the window larger so you focus in on an object. Zooming out makes the window smaller so you can see the entire window.
allows you to zoom in and zoom out on the window. Zooming in makes the window larger so you focus in on an object. Zooming out makes the window smaller so you can see the entire window.
You can click and drag the vertical and horizontal splitter bars to change the size of your panes.
You use the Minimize button ![]() to remove a window from
view. While a window is minimized, its title appears on the taskbar. You click the Maximize button
to remove a window from
view. While a window is minimized, its title appears on the taskbar. You click the Maximize button ![]() to cause a window to fill
the screen. After you maximize a window, clicking the Restore button
to cause a window to fill
the screen. After you maximize a window, clicking the Restore button ![]() returns
the window to its former smaller size. You click the Close button
returns
the window to its former smaller size. You click the Close button ![]() to exit the window and close
the program.
to exit the window and close
the program.