THE CLONE BRUSH
You use the Clone Brush to copy all or part of an image to another location within the same image or to another image. Right-click to select the image or part of the image to be cloned. Left-click to place the cloned image. When using the Clone Brush, the Aligned setting causes each succeeding click of the mouse to paint an additional portion of the original image. The Non-aligned setting, causes each succeeding click of the mouse to repeat the area of the image captured when the source was selected.
Cloning - Aligned
- Open boy.jpg in Paint Shop Pro.
File > Open
Look in: Enter the directory in which you stored your files.
File: boy.jpg
Files of Type: JPEG-JFIF Compliant (*.jpg, *.jif, *.jpeg)
- Open a new image (do not close boy.jpg).
File > New
Settings:
Width: 200 Pixels
Height: 250 Pixels
Resolution: 72 Pixels/inch
Background Color: White
Image Type: 16.7 Million Colors
- Make note of the file name (the file name is displayed on the title bar).
- Move back to the boy.jpg window.
Window > boy.jpg
- Select the Clone Brush
 .
Set the tool options.
Clone Brush Tab Settings:
Shape: Square
Size: 100
Hardness: 100
Opacity: 100
Step: 100
Density: 100
Clone Brush Options
Clone Mode: Aligned
Paper Texture: None
Sample Merged: Yes
Built Up Brush: Yes
- Right-click in the upper left corner of boy.jpg to select your source.
- Move to the new image you created.
Window > Image1
Note: Your file name might be different.
- Left-click in the upper left corner of the image.
- Left-click in the upper right corner of the image.
- Left-click in the lower left corner of the image.
- Note how each succeeding click completes the image.

- Close the new image. Save the image if you like.
File > Close
Cloning - Non-Aligned
- If it is not already open, open boy.jpg in Paint Shop Pro.
File > Open
Look in: Enter the directory in which you stored your files.
File: boy.jpg
Files of Type: JPEG-JFIF Compliant (*.jpg, *.jif, *.jpeg)
- Open a new image (do not close boy.jpg).
File > New
Settings:
Width: 200 Pixels
Height: 250 Pixels
Resolution: 72 Pixels/inch
Background Color: White
Image Type: 16.7 Million Colors
- Make note of the file name of the new image (the file name is displayed on the title bar).
- Move back to the boy.jpg window.
Window > boy.jpg
- Select the Clone Brush. Set the tool options.
Clone Brush Tab Settings:
Shape: Square
Size: 100
Hardness: 100
Opacity: 100
Step: 100
Density: 100
Clone Brush Options
Clone Mode: Non-Aligned
Paper Texture: None
Sample Merged: Yes
Built Up Brush: Yes
- Right-click in the upper left corner of boy.jpg to select your source.
- Move to the new image you created.
Window > Image2
Note: Your file name might be different.
- Left-click in the upper left corner of the image.
- Left-click in the upper right corner of the image.
- Left-click in the lower left corner of the image.
- Note how each succeeding click repeats the area of the image captured when the source was selected.

- Close the new image. Save the image if you like.
File > Close
Cloning - Dragging Your Pointer
- If it is not already open, open boy.jpg in Paint Shop Pro.
File > Open
Look in: Enter the directory in which you stored your files.
File: boy.jpg
Files of Type: JPEG-JFIF Compliant (*.jpg, *.jif, *.jpeg)
- Open a new image (do not close boy.jpg).
File > New
Settings:
Width: 200 Pixels
Height: 250 Pixels
Resolution: 72 Pixels/inch
Background Color: White
Image Type: 16.7 Million Colors
- Make note of the file name of the new image (the file name is displayed on the title bar).
- Move back to the boy.jpg window.
Window > boy.jpg
- Select the Clone Brush. Set the tool options.
Clone Brush Tab Settings:
Shape: Square
Size: 100
Hardness: 100
Opacity: 100
Step: 25
Density: 100
Clone Brush Options
Clone Mode: Non-Aligned
Paper Texture: None
Sample Merged: Yes
Built Up Brush: Yes
- Right-click in the upper left corner of boy.jpg to select your source.
- Move to the new image you created.
Window > Image3
Note: Your file name might be different.
- Left-click in the upper left corner of the image and drag your pointer around the image while holding down the mouse button. The Paint Brush paints the image. You get the same results by using the Aligned Clone Mode.
- Close the new image. Save the image if you like.
File > Close
- Move to boy.jpg.
Window > boy.jpg
- Close the file. Do not save boy.jpg. You will use it again later. Save the new image if you like.
File > Close
THE COLOR REPLACER TOOL
You use the Color Replacer tool to replace one color in an image with another color.
Things You Need To Know:
- Select the replacing color as either the foreground or background color.
- Select the color to be replaced as the other active color (you can use the Dropper tool).
- To replace the foreground color with the background color, move to the image and right-click on the foreground color.
- To replace the background color with the foreground color, move to the image and left-click on the background color.
- To replace all instances of a color, double-click anywhere on the image.
- To replace all instances of a color in a selected area, select the area and then double-click on the image.
- To replace a color with a brush stroke, right-click and drag to replace the foreground color with the background color. Left-click and drag the pointer to replace the background color with the foreground color.
Color Replacement
In this exercise you are going to create an image and then replace the colors.
- Open a new file.
File > New
Settings:
Width: 100 Pixels
Height: 100 Pixels
Resolution: 72 Pixels/inch
Background Color: White
Image Type: 16.7 Million Colors
- Set your foreground color to red:
Settings:
Red: 255
Green: 0
Blue: 0
- Set your background color to black.
Settings:
Red: 0
Green: 0
Blue: 0
- Reset your grid preferences.
File > Preferences > General Program Preferences > Rulers and Units
Settings:
Units: Pixels
Horizontal Spacing: 20
Vertical Spacing: 20
- Turn on the grid, if it is not already on.
View > Grid
- Select the Paint Brush tool. Set the tool options.
Paint Brush Tab Settings:
Paint Brush Type: Normal
Shape: Square
Size: 20
Hardness: 100
Opacity: 100
Step: 25
Density: 100
Paint Brush Options:
Paper Texture: None
Built Up Brush: Yes
- Zoom in on the image.
View > Zoom In By 1
- Left-click once in every other block to create the pattern shown here.

- Select the Color Replacer tool
 .
Set the tool options.
Color Replacer Tab Settings:
Paint Brush Type: Normal
Shape: Square
Size: 20
Step: 25
Density: 100
Color Replacer Options:
Tolerance: 40
Paper Texture: None
Replacing All Occurrences of a Color
- Right double-click on the image. Your image should now look like the one shown here.

Painting with the Replacing Color
- Left-click and hold as you drag the pointer over the image. Color the entire image. Your image should look like the one shown here.

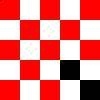
Replacing Selected Occurrences of a Color
- Select the four blocks in the lower right corner of the image. Start by selecting the Selection tool; then set the tool options.
Tool Settings:
Selection Type: Square
Feather: 0
Antialias: Yes
- Select the four blocks in the lower right corner.
- Select the Color Replacer tool.
- Double-right click on the image. Your image should look like the one shown here.
- Close the file. Save the file if you like.
File > Close
| Table of Contents |

